Budget-Friendly Guide: How to Protect Outdoor Equipment Without Breaking the Bank While Maintaining Strong Protection

Jul 03 2026
Outdoor gear is an investment. Whether you enjoy camping, hiking, fishing, backpacking, cycling, or overlanding, your equipment is constantly exposed to some of the harshest conditions on earth—sunlight, rain, dust, humidity, temperature swings, abrasion, and accidental impact. Yet many people assume that protecting outdoor gear requires expensive specialty products or professional storage systems.
That assumption is not only wrong—it often leads to overspending on solutions that are more complicated than necessary.
The reality is that you can build a highly effective protection system for outdoor equipment on a modest budget. The key is understanding what actually causes gear damage, and then applying low-cost, high-impact protection strategies that focus on prevention rather than replacement.
This guide breaks down practical, science-informed, and budget-friendly methods to extend the life of your outdoor gear while keeping costs under control.
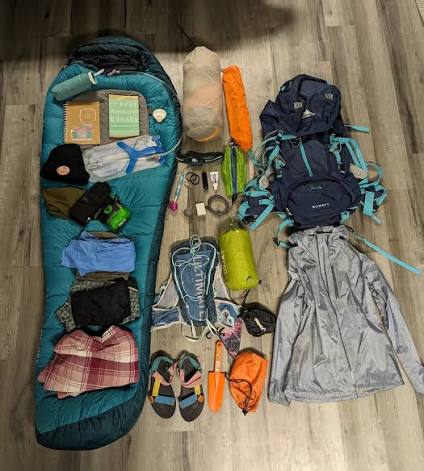
Understanding What Actually Damages Outdoor Equipment
Before choosing protective solutions, it’s important to understand the main threats your gear faces. Most damage falls into six categories:
1. Moisture and humidity
Water is one of the most destructive forces for outdoor gear. It leads to:
Mold and mildew growth
Fabric degradation
Metal corrosion
Adhesive failure in shoes, tents, and backpacks
Even “water-resistant” gear is not immune over long periods.
2. UV exposure
Sunlight slowly breaks down materials through UV radiation. This causes:
Fading colors
Brittle fabrics
Weakening of plastics and coatings
Loss of elasticity in straps and cords
UV damage is cumulative and often invisible until failure occurs.
3. Dirt, sand, and dust
Abrasive particles wear down surfaces over time:
Zippers become jammed
Fabric coatings degrade
Moving parts lose smooth function
4. Mechanical stress
Improper storage or transport causes:
Bent poles (tents, trekking poles)
Compressed insulation in jackets or sleeping bags
Deformed backpacks or frames
5. Temperature extremes
Heat and cold cycles can:
Crack plastics
Dry out rubber seals
Affect battery performance in electronics
6. Improper storage habits
Often the biggest cause of damage is not the environment—but how gear is stored:
Leaving gear wet in bags
Compressing items long-term
Storing in poorly ventilated areas
The Core Principle of Budget Protection: Prevent Instead of Repair
A low-cost protection strategy is built on one simple idea:
It is always cheaper to prevent damage than to repair or replace gear.
Instead of buying expensive protective systems, focus on controlling three variables:
Moisture
Exposure
Physical pressure
Everything else is secondary.
Step 1: Use Low-Cost Storage Systems That Actually Work
You don’t need expensive storage cabinets or branded gear organizers. Simple, affordable solutions often perform just as well.
Plastic storage bins (the foundation of protection)
Clear or opaque plastic bins are one of the most effective storage tools available.
Benefits:
Waterproof barrier against humidity
Dust protection
Stackable for space efficiency
Inexpensive and widely available
Tips for better performance:
Add silica gel packets to reduce moisture
Avoid overpacking to maintain airflow
Label bins for quick access
Dry bags for high-risk items
Dry bags are essential for:
Sleeping bags
Clothing
Electronics
First aid kits
Budget-friendly versions work nearly as well as premium ones if properly sealed.
Vacuum compression bags (use selectively)
These are useful for:
Reducing volume of clothing
Seasonal storage
However, avoid using them for:
Down sleeping bags (long-term compression damage)
Foam-based gear
Step 2: Control Moisture Without Expensive Equipment
Moisture control is one of the most important aspects of gear protection, and it can be done cheaply.
Silica gel packs
These small desiccants are extremely cost-effective.
Use them in:
Storage bins
Shoe compartments
Camera bags
Backpack pockets
They can be reused after drying in sunlight or low heat.
Charcoal as a natural moisture absorber
Activated charcoal helps reduce:
Humidity
Odors
Place small breathable bags inside storage containers.
DIY ventilation strategy
Instead of buying expensive drying systems:
Store gear slightly elevated
Leave small airflow gaps in storage areas
Avoid sealed damp environments like basements without airflow
Step 3: UV Protection on a Budget
Sun damage is often underestimated, but it can be reduced with simple strategies.
Store gear away from direct sunlight
This is the most effective and cost-free solution:
Use closets instead of open shelves
Cover gear with cloth or tarp
Avoid leaving equipment in cars
Use inexpensive UV-blocking covers
Affordable covers or tarps can significantly reduce UV exposure:
Polyethylene tarps
Basic outdoor furniture covers
DIY fabric covers
Rotate gear exposure
If equipment must be stored in semi-exposed areas:
Rotate position periodically
Avoid constant sun-facing orientation
Step 4: Smart Cleaning Habits That Extend Gear Life
Cleaning is often overlooked but is one of the cheapest forms of protection.
After-use cleaning routine
Remove dirt before storage
Wipe down wet surfaces
Dry completely before packing
Even a simple microfiber cloth can dramatically extend gear lifespan.
Avoid harsh chemicals
Expensive cleaning products are not always necessary. In most cases:
Mild soap + water is enough
Avoid strong solvents unless required
Harsh chemicals can degrade coatings and fabrics faster than dirt itself.
Step 5: Proper Drying Is More Important Than People Think
Improper drying causes more damage than most outdoor users realize.
Key rule:
Never store gear while it is damp.
Low-cost drying methods:
Air drying indoors with good ventilation
Hanging gear in shaded outdoor areas
Using fans to accelerate drying
Avoid:
Direct high heat (can damage materials)
Sealed drying spaces
Step 6: Prevent Mechanical Damage with Simple Organization
Physical deformation is preventable with basic organization techniques.
Use soft separation layers
Old towels
Cloth wraps
Foam padding from packaging materials
These prevent:
Scratches
Compression damage
Impact stress during storage
Store gear in “use-ready” condition
Instead of stuffing items randomly:
Pack backpacks loosely
Keep tent poles straight and bundled
Avoid long-term pressure on elastic components
Step 7: Extend Gear Life Through Maintenance (Low Cost, High Impact)
Regular maintenance is one of the cheapest ways to avoid replacement costs.
Zippers
Clean with soft brush
Apply candle wax or graphite for lubrication
Waterproof coatings
Reapply spray coatings only when necessary
Do not over-layer (can reduce breathability)
Metal parts
Wipe dry after exposure to moisture
Light oil application for corrosion prevention
Step 8: DIY Repair Instead of Replacement
A major cost-saving strategy is repairing rather than replacing gear.
Basic repair kit should include:
Fabric patches
Strong adhesive tape
Needle and thread
Small multi-tool
Common repairs:
Tent tears
Backpack strap reinforcement
Jacket seam repair
Shoe sole reattachment (temporary fixes)
Learning basic repair skills can extend gear life by years.
Step 9: Seasonal Storage Strategy for Maximum Savings
Outdoor gear often sits unused for long periods. Seasonal storage mistakes lead to unnecessary replacement costs.
Before storage:
Clean thoroughly
Dry completely
Loosen tensioned parts (straps, cords)
During storage:
Keep in cool, dry place
Avoid stacking heavy items on soft gear
Check periodically for moisture or pests
Step 10: Affordable Protection for Specific Gear Types
Different gear requires different protection priorities.
Tents
Store loosely, not tightly compressed
Keep poles unbent
Avoid moisture at all costs
Backpacks
Do not overstuff during storage
Hang or store upright
Keep zippers clean
Sleeping bags
Store uncompressed in large breathable bag
Avoid vacuum sealing long-term
Electronics (GPS, headlamps, cameras)
Use dry bags or plastic cases
Remove batteries during long storage
Add silica gel packs
Footwear
Clean dirt before storage
Insert paper or shoe trees to maintain shape
Avoid sealed damp containers
Step 11: Build a Low-Cost Outdoor Gear Protection System
Instead of buying expensive solutions individually, think in systems:
Your budget protection system includes:
Plastic bins for structure
Silica gel for moisture control
Cloth covers for UV protection
Basic cleaning tools
Repair kit for longevity
This system is scalable, modular, and extremely cost-efficient.
Step 12: Common Mistakes That Waste Money
Many people spend more by trying to “over-protect” gear incorrectly.
Mistake 1: Overbuying specialty storage gear
Most expensive “gear organizers” offer minimal advantage over simple bins.
Mistake 2: Ignoring moisture
People often focus on dust or scratches while forgetting humidity damage.
Mistake 3: Storing gear immediately after use
Even slightly damp equipment leads to mold and odor problems.
Mistake 4: Using heat to dry everything
Heat can damage coatings, adhesives, and synthetic fibers.
Final Thoughts: Smart Protection Is About Behavior, Not Budget
Protecting outdoor equipment does not require expensive systems. It requires consistent habits, smart storage choices, and an understanding of what actually causes damage.
The most effective protection strategy is built on simplicity:
Keep gear dry
Keep gear clean
Keep gear out of direct sunlight
Store it with minimal stress
Maintain it regularly
When these principles are followed, even inexpensive storage setups can outperform high-end systems used incorrectly.
In the end, the real savings come not from what you buy—but from how long your gear lasts before it needs replacing.
Feel free to leave a message to inquire about wholesale prices for engineering projects.
Need Help with Your Custom Project?
Have questions about materials, sizing, or looking for a quick quote? Drop us a message and our experts will respond within 24 hours.
Chat on WhatsApp
+1 (304) 356-6765
Send us an Email
hello@incustom.com
Picked for You